How to Create a Family Gallery Wall With Custom Portraits
A gallery wall of custom family portraits transforms a hallway, staircase, or living room wall into a visual story of the people who matter most. Here is how to plan, arrange, and style one that feels curated rather than cluttered.
Your Family's Story on the Wall
A single portrait captures a face. A gallery wall captures a family.
There is something powerful about walking down a hallway lined with the faces of the people who built your life — grandparents, parents, children, pets, the moments that defined who you are. Each portrait is a chapter. Together, they tell the whole story.
But a gallery wall only works if it looks intentional. A random collection of mismatched frames and haphazardly placed portraits looks like a notice board in a student flat. A curated gallery wall — planned, styled, and executed with care — looks like a design feature in an architectural magazine.
This guide walks you through the process of creating a family gallery wall that tells your story beautifully.
Step 1: Choose Your Wall
Not every wall is suited for a gallery arrangement. The best gallery walls are:
Staircase Walls
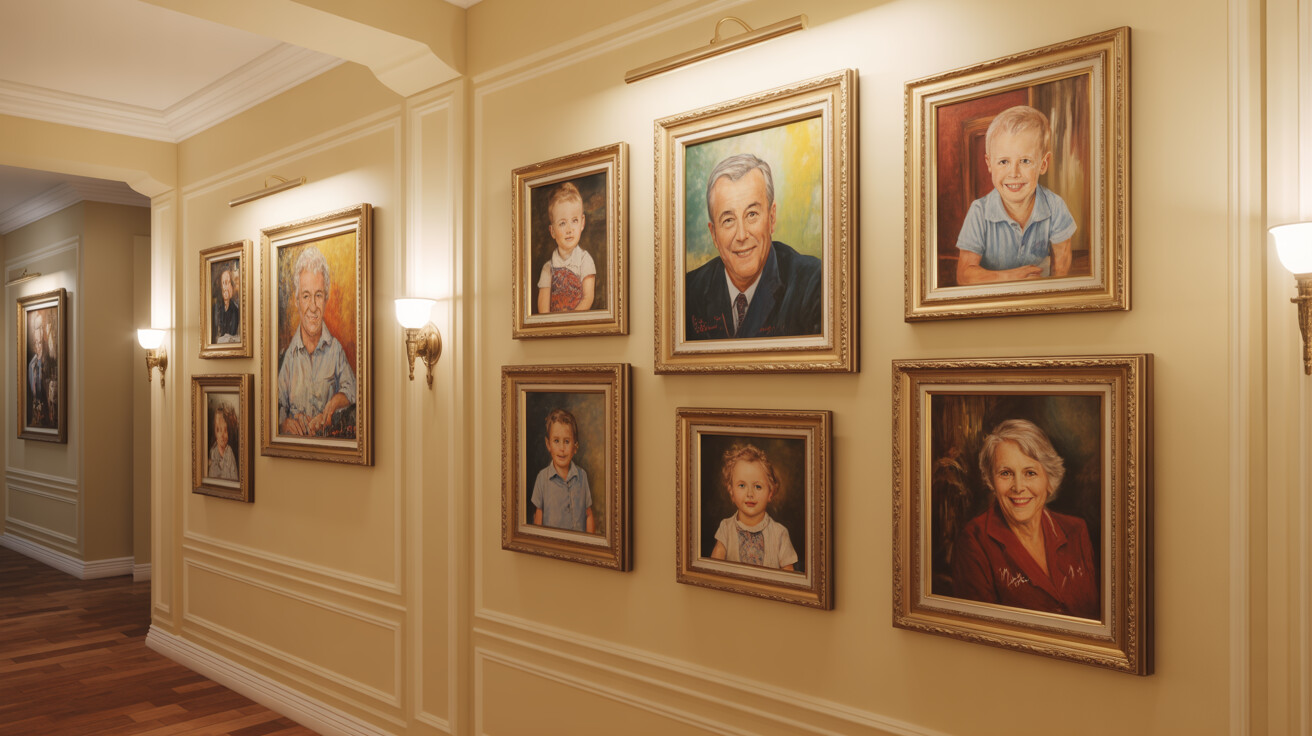
The classic gallery wall location. The ascending wall follows the natural movement of people going up and down the stairs, creating a progression of faces. The height variation allows for different hanging positions, and the length of the wall accommodates multiple pieces.
Hallway Walls
A long hallway wall offers a linear canvas for a gallery. Visitors walk past the portraits one by one, creating a narrative experience. Hallway galleries work best with consistent frame sizes and even spacing.
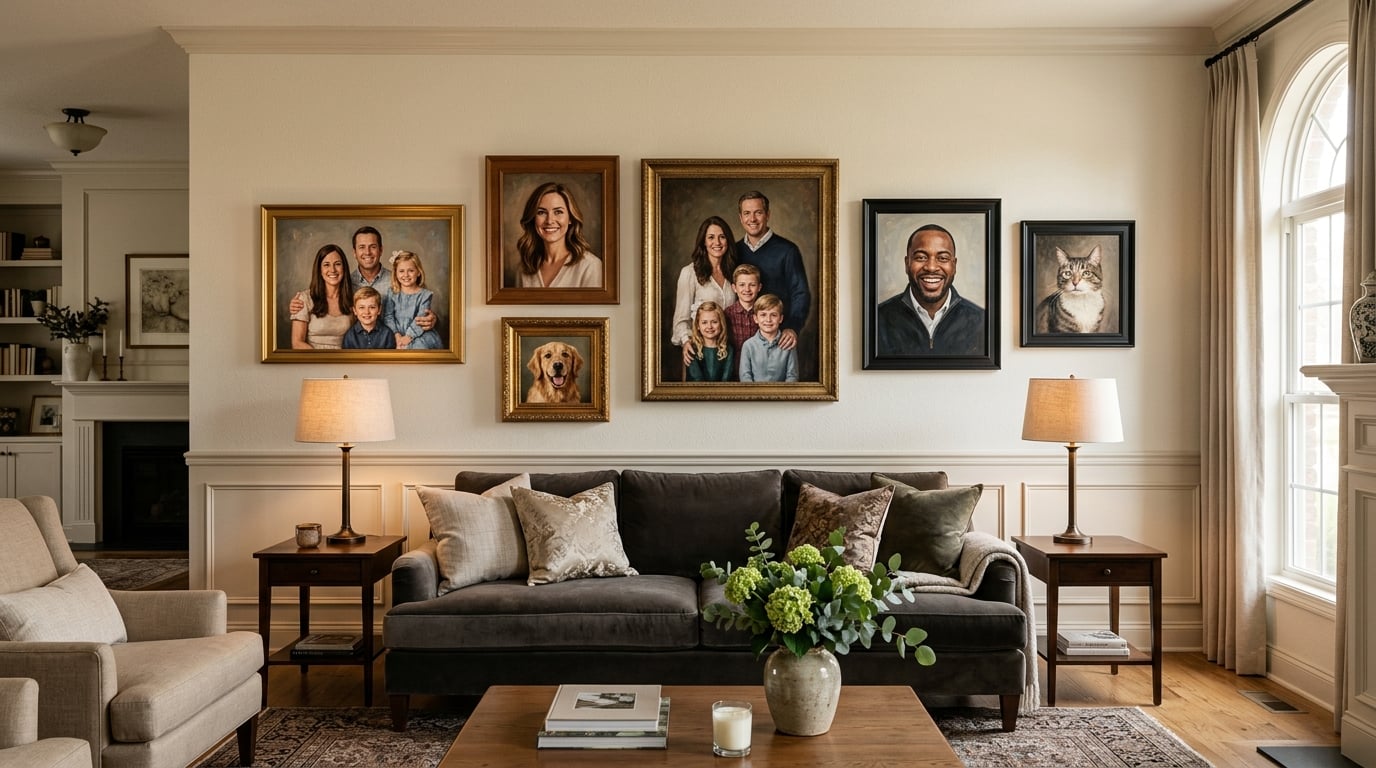
Living Room Feature Walls
A large, uninterrupted wall in the living room can accommodate a bold gallery arrangement. This placement makes the gallery the room's focal point and a conversation starter for every visitor.
Above a Console or Sideboard
A gallery arrangement above a long piece of furniture grounds the art and creates a styled vignette. The furniture provides a visual base, and the portraits fill the wall space above.
Step 2: Select Your Subjects
The subjects you choose determine the story your gallery wall tells.
The Generational Gallery
Great-grandparents, grandparents, parents, children — each generation represented. This arrangement tells the story of where your family came from and where it is going.
The Immediate Family
Parents, children, and pets — the people who live in the house. This creates a gallery that feels current, personal, and alive.
The Milestone Gallery
Portraits from significant moments — wedding day, first child, graduation, retirement. Each painting marks a chapter in the family's shared history.
The Mixed Gallery
People, pets, and places — the faces you love alongside the places that matter. A portrait of your grandmother next to a painting of the family holiday home. A portrait of your dog next to a painting of your children.
Step 3: Choose a Consistent Style
Visual cohesion is what separates a gallery wall from a random collection of pictures.
Same Medium
All oil paintings, all watercolours, or all pencil sketches. Consistency of medium creates an immediate sense of curation.
Same Colour Palette
Even within the same medium, ask for a consistent colour palette across portraits — warm tones throughout, neutral backgrounds, similar skin tone rendering. This prevents any single portrait from clashing with its neighbours.
Same Artist
If possible, commission all the portraits from the same artist or studio. The consistency of technique, style, and interpretation creates a unified collection that feels intentional.
Step 4: Plan Your Layout
The arrangement of the portraits matters as much as the portraits themselves.
The Grid
Portraits arranged in a symmetrical grid — equal spacing, identical frame sizes, clean horizontal and vertical lines. This is the most formal arrangement and works beautifully with matching frames in traditional interiors.
The Salon Style
Portraits of varying sizes arranged asymmetrically around a central point. This is the classic gallery approach — more dynamic and visually interesting than a grid, but requiring more careful planning to avoid looking chaotic.
The Linear Row
A single horizontal row of portraits, evenly spaced, at consistent height. This works perfectly for hallways and above long pieces of furniture. Simple, clean, and effective.
The Staircase Ascent
Portraits ascending at the same angle as the staircase, following the line of the handrail. The natural progression creates movement and draws the eye upward.
Step 5: Frame Consistently
Matching Frames
The safest and most polished approach. Choose one frame style — gold, black, natural wood — and use it for every portrait. Matching frames create instant cohesion and allow the paintings themselves to be the variables.
Coordinated Frames
Different frames that share a common element — all the same colour but different widths, all wood but different finishes, all the same width but different colours. This creates a collected, curated feel that is less formal than matching frames.
The Rule
When in doubt, match. You can always swap individual frames later, but starting with consistency gives you a solid foundation.
Step 6: Hang With Precision
The Paper Template Method
- Cut paper to the exact size of each framed portrait
- Arrange the paper templates on the floor until the layout feels right
- Tape the templates to the wall
- Step back and assess — adjust until balanced
- Nail through the paper templates, then remove the paper
Spacing Rules
- 2–3 inches between frames — close enough to feel like a collection, far enough apart to let each piece breathe
- Consistent gaps — uneven spacing looks accidental. Use a ruler or spacer for precision
- Centre line at 57–60 inches — the centre of the overall arrangement should sit at eye level
Step 7: Light the Gallery
A gallery wall without good lighting is a gallery wall that nobody appreciates after dark.
Track Lighting
Adjustable ceiling track lights aimed at the gallery wall create even illumination across all the portraits. This is the most professional approach.
Picture Lights
Individual picture lights above each portrait add a warm, intimate glow. This works beautifully for smaller gallery walls or formal arrangements.
Wall Sconces
Wall-mounted sconces on either side of the gallery provide ambient light that enhances without spotlighting. This creates a softer, more residential feel.
Building the Gallery Over Time
A gallery wall does not need to be completed in one go. Many of the most meaningful gallery walls are built over years — a new portrait added for each new baby, each milestone, each beloved pet.
Plan for Growth
When creating your initial layout, leave space for future additions. This prevents the wall from looking complete before the family's story is done.
Maintain Consistency
As you add new portraits, use the same frame style and the same artistic medium. Consistency is what holds a multi-year gallery together.
Your Wall, Your Legacy
A family gallery wall is one of the most powerful design features a home can have. It transforms a blank wall into a visual narrative — a story of love, lineage, and legacy told in paint and frame.
Every PaintedForU portrait comes with unlimited free revisions, free shipping, and a 100% satisfaction guarantee.
Start your gallery wall now and begin telling your family's story in art.Frequently Asked Questions
How many portraits do I need for a gallery wall?
A minimum of four and a maximum of twelve works well for most walls. Five to eight is the sweet spot — enough to create visual impact without overcrowding. You can always start with a few and add more over time.
Should all the portraits be the same size?
Not necessarily. A mix of sizes creates visual interest and a curated feel. However, keeping all the portraits within a similar size range (e.g., 8×10 to 16×20 inches) prevents any single piece from dominating. The key is intentional variety, not randomness.
Do the frames need to match?
Matching frames create a cohesive, polished look. Mismatched frames create an eclectic, collected feel. Both approaches work — choose based on your interior style. If mixing frames, keep one element consistent (colour, material, or width) for cohesion.
What is the best wall for a gallery arrangement?
Staircase walls, long hallways, and large living room walls are the most popular choices. The wall should be wide enough to accommodate multiple pieces and visible enough to be appreciated daily.
How far apart should the portraits be spaced?
2–3 inches between frames is the standard for gallery walls. Consistent spacing is more important than the exact measurement — uneven gaps look accidental and sloppy.
Can I build a gallery wall over time?
Absolutely. Many families start with three or four portraits and add new ones as milestones occur — new babies, weddings, graduations. Plan the overall layout with space for future additions so the wall grows intentionally.
Marcus Rivera
Lead Portrait Artist
Marcus is PaintForU's lead portrait artist and studio director. With a Fine Arts degree from the Royal Academy, he brings deep knowledge of oil painting techniques to every guide he writes.
Ready to Create Your Portrait?
Free worldwide shipping, unlimited revisions, and 100% satisfaction guaranteed.
Start Your Portrait